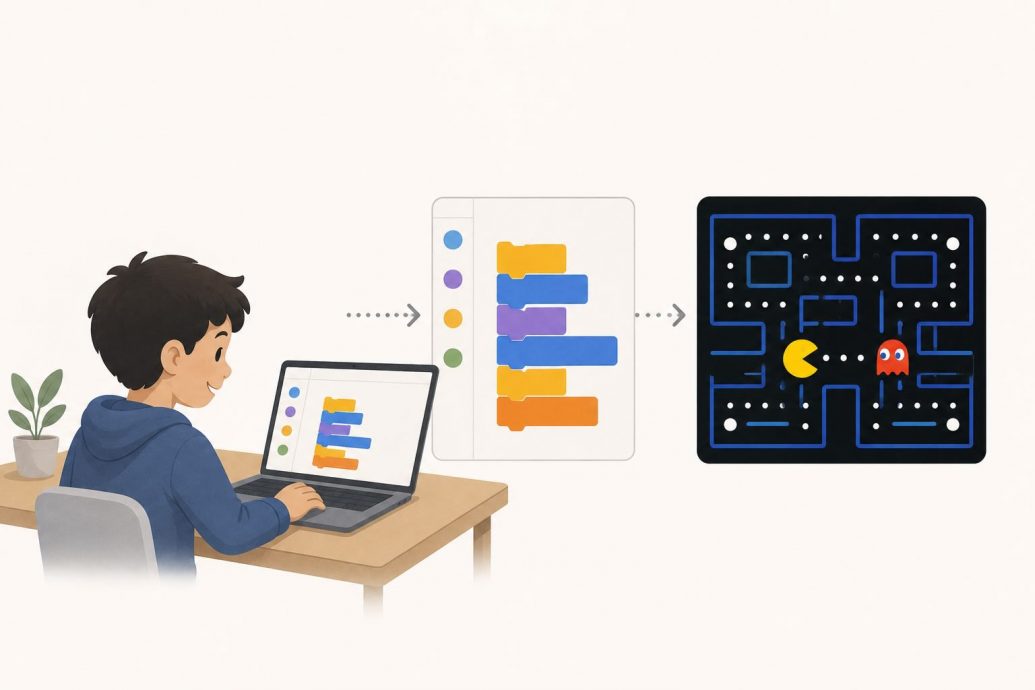
Introduction
Scratch has quietly become the world’s most powerful gateway into programming for young learners, and building a Pacman game is one of the most rewarding projects a child can tackle on the platform. With over 130 million registered users as of late 2024, Scratch’s drag-and-drop coding environment lets kids create playable games without writing a single line of traditional code. The beauty of a Pacman project lies in how it bundles together essential programming concepts (loops, conditionals, variables, and collision detection) inside a game that children already know and love. Parents searching for meaningful screen time activities consistently find that game-based coding projects hold a child’s attention far longer than passive tutorials or worksheets. This tutorial walks through every step of building a fully functional Pacman game in Scratch, from designing the maze to programming ghost behavior. By the end, young coders will have a shareable project they can customize, remix, and proudly show off to friends and family.
Essential Questions About Building Pacman in Scratch
What coding skills do kids learn by making Pacman on Scratch?
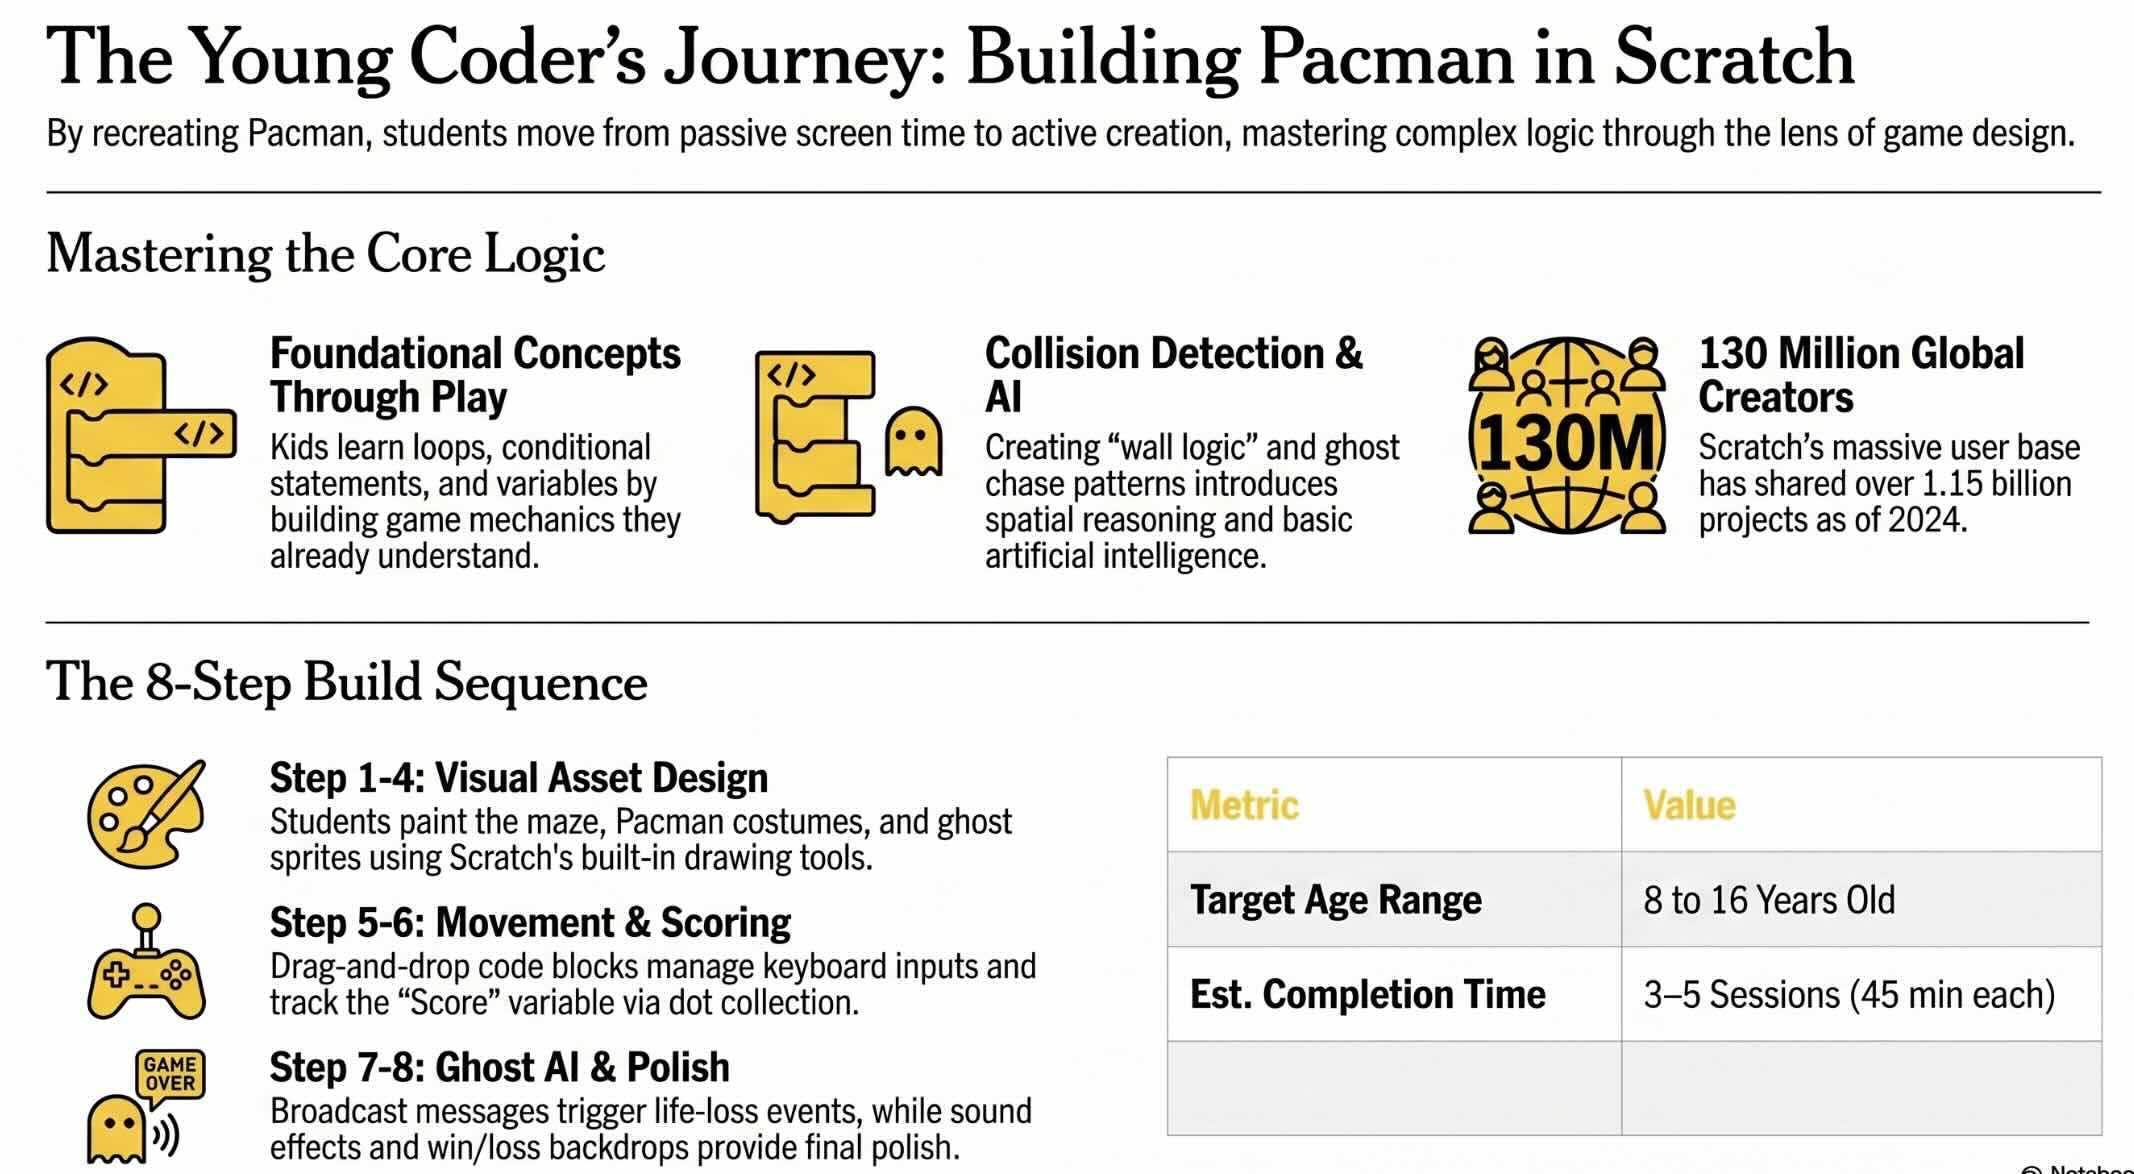
Kids learn loops, conditional statements, variables for scoring and lives, collision detection, sprite animation, and basic AI movement patterns through building a complete Pacman game in Scratch.
Is Scratch free, and what age is it designed for?
Scratch is completely free and maintained by the MIT Media Lab. It is designed primarily for learners aged 8 to 16, though children as young as six and adults of all ages use the platform regularly.
How long does it take a kid to build Pacman on Scratch?
A beginner can complete a basic Pacman game in three to five sessions of 30 to 45 minutes each, depending on how much customization and polish they want to add to their project.
Key Takeaways
- Game-based coding projects like Pacman improve problem-solving, computational thinking, and resilience in young learners.
- Scratch’s block-based coding environment makes Pacman accessible to kids as young as eight years old with zero prior coding experience.
- Building a Pacman game teaches loops, variables, conditionals, and collision detection in a context that feels like play rather than study.
- Parents can support the process by setting up a free Scratch account and encouraging creative customization of mazes, sprites, and sound effects.
Table of contents
- Introduction
- Essential Questions About Building Pacman in Scratch
- Key Takeaways
- How to Build a Pacman Game on Scratch Step by Step
- Step 1: Create Your Account and Open the Editor
- Step 2: Design the Maze Backdrop
- Step 3: Create the Pacman Sprite with Two Costumes
- Step 4: Draw Ghost and Dot Sprites
- Step 5: Code Pacman Movement and Animation
- Step 6: Program Dot Collection and Scoring
- Step 7: Code Ghost Movement and Collisions
- Step 8: Add Lives, Game Over, and Final Polish
- What Is Scratch and Why Kids Love It
- Why Pacman Is the Perfect First Coding Project
- Getting Started with Your Scratch Account
- Designing the Pacman Maze Backdrop
- Creating the Pacman Sprite
- Drawing Ghost Characters and Dot Sprites
- Programming Pacman Movement with Arrow Keys
- Maze Wall Detection and Collision Logic
- Making Pacman Eat Dots and Track Scores
- Building Ghost AI and Movement Patterns
- Adding Lives, Game Over, and Win Conditions
- Sound Effects, Animations, and Visual Polish
- Coding Concepts Kids Learn from Pacman Projects
- Common Mistakes Young Coders Make (and Fixes)
- Parent and Educator Tips for Supporting Young Coders
- How Game-Based Learning Boosts Computational Thinking
- Screen Time, Safety, and Balanced Coding Habits
- The Ethical Side of Teaching Kids to Code
- Where Scratch and Kids Coding Are Headed Next
- Key Insights on Coding for Kids and Scratch Game Development
- Coding for Kids: Comparing Learning Approaches
- How Scratch Pacman Projects Are Transforming Classrooms
- Lessons From Early Coding Education Programs Worldwide
- Common Questions About Making Pacman on Scratch for Kids
How to Build a Pacman Game on Scratch Step by Step
Step 1: Create Your Account and Open the Editor
Visit scratch.mit.edu and click “Join Scratch” to register a free account with a username, password, and email address. Once registered and logged in, click the “Create” button in the top navigation bar to open a fresh project in the Scratch editor. The editor will display the default cat sprite on the stage, which you will replace with your own Pacman character in the following steps.
Pro Tip: Bookmark the Scratch editor page and give your project a descriptive name like “My Pacman Game” immediately, because Scratch auto-saves projects to your account, and a clear name makes it easy to find your work later.
Step 2: Design the Maze Backdrop
Click the Stage panel in the bottom-right corner of the editor, then select the “Backdrops” tab and click the paintbrush icon to open the drawing tools. Select the line tool and choose a distinct color (blue is traditional) for the maze walls, then draw a series of connected corridors with dead ends and open areas. Make sure the paths between walls are wide enough for a small circle to fit through, which you can check by drawing a test circle and dragging it around the paths visually.
Recommended maze wall settings:
- Line thickness: 4-6 pixels
- Wall color: Blue (#0000FF or similar)
- Path width: At least 20 pixels between walls
- Include at least 2-3 dead ends for strategic gameplay
Step 3: Create the Pacman Sprite with Two Costumes
Delete the default cat sprite by right-clicking it and selecting “delete,” then click the paintbrush icon in the sprite panel to create a new blank sprite. Use the circle tool to draw a solid yellow circle, then use the eraser or a triangle overlay to remove a wedge and create the open-mouth Pacman shape. Duplicate this costume and close or reduce the mouth wedge on the second version, giving you two costumes that create a chomping animation when alternated.
Warning: Make sure both costumes are centered on the canvas crosshair, because off-center sprites wobble during rotation and create difficult-to-diagnose visual bugs.
Step 4: Draw Ghost and Dot Sprites
Create four ghost sprites using the paint tool, each with a rounded top, wavy bottom edge, and distinct color (red, pink, cyan, orange). For the dots, create a single small white or yellow circle sprite approximately 8 to 10 pixels in diameter. This single dot sprite will be cloned during gameplay to populate the maze, so you only need to draw one. Optionally, create a larger “power pellet” sprite for advanced gameplay features.
Step 5: Code Pacman Movement and Animation
Select the Pacman sprite and build the following code structure in the scripting area using drag-and-drop blocks from the block palette.
When green flag clicked
Set rotation style [left-right]
Go to x: [-200] y: [0]     // Starting position in your maze
Forever
    If <key [up arrow] pressed?> then
        Point in direction (0)
    End
    If <key [down arrow] pressed?> then
        Point in direction (180)
    End
    If <key [left arrow] pressed?> then
        Point in direction (-90)
    End
    If <key [right arrow] pressed?> then
        Point in direction (90)
    End
    Move (4) steps
    If <touching color [blue]?> then
        Move (-4) steps
    End
    Next costume
    Wait (0.1) seconds
End
Step 6: Program Dot Collection and Scoring
Create a variable called “Score” from the Variables category and add the following code to the dot sprite to handle cloning and collection. The clone system places dots at predefined positions across the maze, and each clone deletes itself when Pacman touches it.
When green flag clicked
Set [Score] to (0)
Hide
// Create clones at multiple positions
Go to x: [-180] y: [120]
Create clone of [myself]
Go to x: [-140] y: [120]
Create clone of [myself]
// Repeat for all dot positions in your maze

When I start as a clone
Show
Forever
    If <touching [Pacman]?> then
        Change [Score] by (1)
        Play sound [chomp]
        Delete this clone
    End
End
Step 7: Code Ghost Movement and Collisions
Select each ghost sprite and add movement code that creates patrol-style behavior, along with collision detection that triggers a life-loss event when a ghost touches Pacman.
When green flag clicked
Go to x: [0] y: [0]     // Ghost starting position
Forever
    Point in direction (pick random (1) to (360))
    Move (3) steps
    If on edge, bounce
    If <touching color [blue]?> then
        Turn right (180) degrees
        Move (3) steps
    End
    If <touching [Pacman]?> then
        Broadcast [ghost caught pacman]
    End
End
Pro Tip: Make one ghost use “point towards Pacman” instead of random directions to create a challenging chaser that keeps gameplay exciting.
Step 8: Add Lives, Game Over, and Final Polish
Create a “Lives” variable, set it to 3 at game start, and add code to the Pacman sprite that responds to the ghost collision broadcast by decrementing lives and checking for game-over conditions.
When I receive [ghost caught pacman]
Hide
Play sound [lose life sound]
Change [Lives] by (-1)
If <(Lives) = (0)> then
    Switch backdrop to [gameover]
    Stop [all]
End
Wait (2) seconds
Go to x: [-200] y: [0]
Show
Add sound effects to enhance gameplay, test thoroughly by playing through multiple times, and share your finished project with the Scratch community by clicking the “Share” button at the top of the editor.
What Is Scratch and Why Kids Love It
Scratch is a free, block-based visual programming language developed by the MIT Media Lab’s Lifelong Kindergarten group that allows children to create interactive stories, animations, and games by snapping together color-coded code blocks instead of typing syntax. Designed for ages 8 to 16 and used in over 150 countries and 70 languages, Scratch teaches computational thinking and creative expression through a hands-on, project-driven approach that turns abstract programming concepts into tangible, shareable creations.
The platform thrives because it removes the barriers that make traditional coding intimidating for young learners. There are no semicolons to forget, no compiler errors to decode, and no complex file structures to navigate before seeing results on screen. Kids drag motion blocks, snap control structures together, and watch their sprites respond instantly on the stage area, which provides the kind of immediate visual feedback that keeps children engaged. Scratch also operates as a social platform where young coders can share projects, remix each other’s work, and leave constructive comments in a moderated online community. This combination of accessibility, creativity, and community is what makes Scratch the starting point for millions of children exploring how technology has changed teaching and learning around the globe. The platform’s low floor, high ceiling design philosophy means beginners can start creating within minutes while advanced users build surprisingly complex projects that rival simple commercial games.
Why Pacman Is the Perfect First Coding Project
Pacman holds a unique position in gaming history that makes it an ideal introduction to game development for kids. Created by Japanese designer Toru Iwatani and released by Namco in 1980, the game was intentionally designed to be simple, non-violent, and universally appealing. Iwatani wanted to attract a broader audience to arcades, and he succeeded by building a game centered on eating rather than shooting, with a character inspired by a pizza with one slice missing. This same simplicity makes Pacman a natural fit for a first coding project, because kids already understand the core mechanics: move through a maze, eat dots, and avoid ghosts.
From a programming perspective, Pacman introduces nearly every foundational concept a young coder needs to learn. The project requires sprite creation for the main character, ghosts, and collectible dots, which teaches kids about digital asset design and creative expression. Movement controls demand an understanding of keyboard input and directional logic, while maze boundaries introduce collision detection and coordinate-based positioning. Scoring and lives bring variables into play, and ghost behavior opens the door to basic artificial intelligence programming. Each of these concepts builds on the previous one in a logical sequence that mirrors how professional game developers approach their own projects.
The emotional payoff of completing a Pacman game should not be underestimated, because children who build something playable experience a genuine sense of accomplishment that fuels continued learning. Watching a character respond to their code, chase through a maze they designed, and trigger a game-over screen they programmed creates a feedback loop of pride and curiosity that worksheets and lectures simply cannot replicate. This is exactly why so many coding educators and platforms recommend Pacman as a cornerstone project for beginners.
Getting Started with Your Scratch Account
The first step in building a Pacman game is creating a free account on the Scratch website at scratch.mit.edu. Kids will need a username, a password, and a valid email address for verification, and parents should assist younger children with the registration process to ensure the account is set up properly. Once the account is active, clicking the “Create” button at the top of the page opens the Scratch editor, which is the workspace where all coding and design happens. The editor interface is divided into three main areas: the block palette on the left, the scripting area in the center, and the stage with sprite management on the right.
Before diving into the Pacman build, young coders should spend a few minutes exploring the Scratch editor to understand how the different areas work together. Dragging a “move 10 steps” block onto the scripting area and clicking it will make the default cat sprite move on the stage, demonstrating the instant feedback loop that makes Scratch so engaging. Experimenting with blocks from the Motion, Looks, and Sound categories builds familiarity with the interface and reduces the intimidation factor when the real project begins. Parents can encourage this exploratory phase by sitting alongside their child and asking questions like “what do you think will happen if you change that number?” rather than directing every action. The goal is to build comfort and confidence before the structured tutorial work begins, and even five minutes of unstructured play can make a meaningful difference in how receptive a child is to following step-by-step instructions later.
Designing the Pacman Maze Backdrop
Building the maze is the creative foundation of the entire Pacman project, and it is where kids get to express their artistic side before any coding begins. In the Scratch editor, the maze is drawn directly on the stage backdrop rather than built from individual sprites, which keeps the project simpler and more manageable for beginners. To start, click the stage area in the bottom-right corner of the editor, then select the “Backdrops” tab and choose the paint option to open the drawing tools. Using the line tool (not the freehand brush) ensures that maze walls are straight and consistent, which becomes critical later when programming collision detection.
The maze design should follow a few practical guidelines to make the coding process smoother. Walls should be drawn in a single, consistent color (blue is traditional for Pacman) because the collision detection code will rely on the sprite touching that specific color. Paths between walls need to be wide enough for the Pacman sprite to navigate without getting stuck, and young coders should test this by placing a small circle on the stage and checking that it fits comfortably between the lines. The maze should include at least one large open area for gameplay variety, along with corridors and dead ends that create strategic choices for the player during the game.
Kids should also create a second backdrop for the “Game Over” screen at this stage, since having both backdrops ready before coding begins prevents interruptions later in the build process. The Game Over backdrop can be as simple as text on a dark background, or it can include illustrations and decorations that reflect the child’s personal style. Some young coders enjoy creating elaborate Game Over screens with animated text or colorful designs, and this is a healthy creative outlet that makes the project feel more personal. The key is to label each backdrop clearly (such as “gameboard” and “gameover”) so that the code can reference them by name without any confusion down the line.
Creating the Pacman Sprite
The next step is designing the star of the game: the Pacman character itself. In the Scratch sprite area, click the “Choose a Sprite” icon and select the paint option to create a custom sprite from scratch rather than using a premade character from the library. Pacman’s design is elegantly simple, consisting of a yellow circle with a triangular wedge removed to create the iconic open mouth. Using the circle tool filled with yellow and the eraser or a triangle shape to cut out the mouth gives kids a recognizable character in just a few minutes of drawing.
For a more polished result, young coders should create two costumes for the Pacman sprite: one with the mouth open and one with the mouth closed or nearly closed. Switching between these two costumes rapidly during gameplay creates the classic chomping animation that makes Pacman feel alive and responsive. Each costume should be centered properly in the drawing canvas, because an off-center sprite will wobble and drift when it rotates during gameplay, which creates frustrating bugs that are difficult for beginners to diagnose. Taking an extra minute to align costumes properly at this stage saves significant debugging time later in the project, and it teaches kids an important lesson about the value of careful preparation in software development.
Drawing Ghost Characters and Dot Sprites
No Pacman game is complete without the colorful ghosts that chase the player through the maze, and creating these antagonists is where kids really start to have fun with character design. Each ghost should be drawn as a separate sprite using the paint tool, with a rounded top and a wavy bottom edge to capture the classic ghost silhouette. The traditional four ghosts use red, pink, cyan, and orange colors, and each ghost should have two small white eyes with dark pupils to give them personality and visual clarity against the maze background.
The collectible dots that Pacman eats to earn points are created as a single small sprite, typically a white or yellow circle no larger than about 10 pixels in diameter. Rather than drawing dozens of individual dot sprites (which would make the project unmanageable), Scratch’s clone feature will be used later to duplicate a single dot sprite across the entire maze during gameplay. This is an excellent teaching moment about efficiency in programming, because kids learn that a smart approach (one sprite with many clones) is far better than a brute-force approach (drawing one hundred separate sprites) when building any piece of software.
For kids who want to take their game further, a special “power pellet” sprite can also be created at this stage, using a larger dot in a different color (traditionally white or flashing). The power pellet introduces the concept of game state changes, since eating one will eventually trigger a temporary mode where Pacman can chase and eat the ghosts instead of running from them. This advanced feature is optional for a first build, but planning the sprite now means it is ready to be coded whenever the young developer is ready to tackle that challenge.
Programming Pacman Movement with Arrow Keys
With all the visual assets created, the real coding begins by programming Pacman to move in response to keyboard input. This is the moment when abstract code blocks transform into visible, interactive behavior on the stage, and it is typically the most exciting part of the build process for kids. The movement code starts with an Events block: “when green flag clicked,” which is the trigger that tells Scratch to begin executing the code below it whenever the player presses the green flag button above the stage.
Below the event trigger, a “forever” loop from the Control category keeps the movement code running continuously throughout the game. Inside this forever loop, four “if” blocks from the Control category check whether the up, down, left, or right arrow keys are being pressed. Each directional check is paired with a “point in direction” block from the Motion category: up corresponds to direction 0, right to 90, down to 180, and left to negative 90 in Scratch’s coordinate system. After pointing in the correct direction, a “move” block advances the sprite forward by a small number of steps (usually 3 to 5) to create smooth, responsive movement.
The costume-switching animation should be integrated directly into the movement loop to create the chomping effect while Pacman moves. Adding a “next costume” block inside the forever loop causes Scratch to alternate between the open-mouth and closed-mouth costumes automatically, and adjusting the loop speed or adding a short “wait” block fine-tunes the animation speed. Kids can experiment with different step sizes and wait durations to find a balance between smooth animation and responsive controls, which introduces the concept of playtesting and iteration that professional game developers use every day.
One critical detail that beginners often miss is setting Pacman’s rotation style to “left-right” rather than the default “all around” option, which prevents the sprite from flipping upside down when moving downward. This is accessed through the sprite properties panel and can also be set using a “set rotation style” block at the start of the game code. Without this adjustment, Pacman will rotate awkwardly when changing directions, and fixing it after the fact means tracking down a visual bug that seems random until the coder understands how Scratch handles sprite rotation. Teaching kids to set the rotation style early builds the habit of configuring initial states before writing behavioral code, which is a practice that carries over into every programming language they will learn in the future.
Maze Wall Detection and Collision Logic
Collision detection is the mechanism that prevents Pacman from walking through walls, and it is where many young coders encounter their first real programming challenge. The logic works by checking whether the Pacman sprite is touching the wall color after each movement step, and if it is, reversing the movement to push the sprite back to a valid position. Inside the forever loop, immediately after the “move” block, an “if touching color” block from the Sensing category checks for contact with the maze wall color (the blue that was used to draw the maze backdrop).
When the color touch is detected, a “move negative steps” block pushes Pacman backward by the same number of steps it just moved forward, effectively canceling the movement into the wall. This creates the illusion that Pacman stops at the wall boundary, when in reality the sprite briefly enters the wall and is instantly pushed back. The key to making this feel natural is matching the forward and backward step values exactly, because a mismatch will cause Pacman to either clip through thin walls or get stuck at the edge of thicker ones. Kids should test this by running the game and deliberately steering Pacman into walls from every angle to verify that the collision response feels consistent.
The color-matching approach to collision detection has one important requirement: the wall color must be unique and not used anywhere else in the game. If dots, ghosts, or other sprites share the same color as the maze walls, the collision detection will trigger incorrectly and create confusing bugs. Young coders learn through this constraint that careful planning and consistent design choices prevent entire categories of errors. This is a transferable lesson that applies to database design, user interface development, and every other domain of software engineering.
Making Pacman Eat Dots and Track Scores
The scoring system transforms the Pacman project from a movement demo into a real game, and it introduces variables for the first time in many young coders’ experience. Before writing the dot-eating code, a variable called “Score” needs to be created using the Variables section in the block palette, and its initial value should be set to zero at the start of the game using a “set Score to 0” block placed under the “when green flag clicked” event. The Score variable will appear as a visible counter on the stage, giving players real-time feedback about their progress during gameplay.
The dot sprite code handles both the visual distribution of dots across the maze and the detection of when Pacman eats them. Under the “when green flag clicked” event for the dot sprite, a loop creates multiple clones of the dot sprite at various positions throughout the maze pathways. Each clone then continuously checks whether it is touching the Pacman sprite, and when contact is detected, the clone plays a short sound effect, increments the Score variable by one point, and deletes itself from the stage. This clone-based approach is computationally efficient and teaches kids about a design pattern that mirrors how objects are managed in professional game engines.
Testing the scoring system requires playing through the maze and verifying that every dot disappears when Pacman touches it, that the score increments correctly each time, and that no dots spawn inside walls or outside the playable area. Young coders should watch the score counter on the stage while testing and compare it against how many dots they actually collected to catch any bugs in the counting logic. This systematic approach to testing (running the game, observing the results, comparing against expectations, and fixing discrepancies) is the fundamental scientific method applied to software, and kids who practice it build analytical habits that serve them well in every academic subject.
Building Ghost AI and Movement Patterns
Ghost behavior is where the Pacman project becomes genuinely interesting from a computer science perspective, because programming enemies that feel challenging but fair requires basic artificial intelligence concepts. The simplest ghost AI uses a “forever” loop that points the ghost in a random direction, moves it forward, and bounces off the stage edges. This creates unpredictable movement that fills the maze with moving obstacles, and it is the recommended starting point for beginners because it requires only three or four blocks to implement.
For more advanced coders, one ghost can be programmed to actively chase Pacman by using the “point towards Pacman” block inside its movement loop. This creates a pursuer that always knows where the player is and moves directly toward them, which increases the difficulty significantly and introduces the concept of goal-oriented AI behavior. The chasing ghost should move slightly slower than Pacman (using fewer steps per loop iteration) to give the player a fair chance to escape, and adjusting this speed ratio is an excellent exercise in game balancing that teaches kids how professional designers tune difficulty settings.
Each ghost needs code that detects when it touches Pacman and triggers a consequence. When a ghost touches the Pacman sprite, it should broadcast a message (such as “ghost caught Pacman”) using Scratch’s broadcast system, which allows different sprites to communicate with each other without being directly connected. The Pacman sprite then receives this broadcast and responds by hiding briefly, playing a sound effect, and decrementing the Lives variable. Broadcasting is one of Scratch’s most powerful features because it mirrors how real software systems use events and messages to coordinate between independent components, and understanding it prepares kids for concepts like event-driven programming and publish-subscribe patterns in later languages.
The wall collision code for ghosts follows the same color-detection logic used for Pacman, but instead of stopping at walls, ghosts can be programmed to pick a new random direction when they touch a wall color. This creates more natural-looking movement patterns as ghosts navigate the maze corridors, turning corners and reversing direction when they hit dead ends. Adding slight variations in speed or behavior between the four ghosts makes the game feel more dynamic, since players must develop different strategies for each ghost rather than treating them all as identical threats.
Scratch Pacman Project Explorer
Adjust settings to see how project complexity changes the coding concepts learned, time required, and skill level needed.
Project Settings
Ghost AI Type
Project Estimates
Coding Concepts Breakdown
Adding Lives, Game Over, and Win Conditions
A complete game needs clear start and end states, and adding lives and game-over logic gives the Pacman project the structure that turns it from a tech demo into a finished product. A new variable called “Lives” should be created and set to 3 (or any number the child prefers) at the start of the game, and it should appear visually on the stage alongside the Score variable so players can track both values during gameplay. When Pacman receives the “ghost caught Pacman” broadcast, the Lives variable decreases by one, the sprite hides briefly, and then it reappears at its starting position to give the player another chance.
The game-over condition checks whether the Lives variable has reached zero, and when it does, the game responds by switching the backdrop to the “gameover” screen, hiding all sprites, and stopping all scripts. This sequence should be placed inside a conditional block that runs after every life is lost, ensuring the check happens at the right moment rather than continuously. For young coders, this is often their first encounter with the concept of state management, because the game must track whether it is in a “playing” state, a “lost a life” state, or a “game over” state and behave differently in each case.
A win condition can also be added by checking whether all dot clones have been deleted from the stage, which means Pacman has eaten every dot in the maze. Using a second variable to track the number of remaining dots (decremented each time a dot is eaten and checked against zero) provides a clean trigger for the victory state. When the player wins, the game can switch to a custom “You Win” backdrop, play a celebratory sound, and display the final score. Adding both win and lose conditions teaches kids that every interactive system needs defined endpoints, and designing these endpoints thoughtfully is what separates a frustrating experience from a satisfying one.
Sound Effects, Animations, and Visual Polish
Sound design brings a Pacman game to life in ways that visual elements alone cannot achieve, and Scratch’s built-in sound library makes adding audio effects accessible to complete beginners. The Scratch sound editor includes dozens of preloaded sounds, and kids can browse through effects categories to find eating sounds for dot collection, alarm tones for ghost encounters, and celebratory jingles for winning the game. Each sound is added to the relevant sprite and triggered with a “play sound” block at the appropriate moment in the code, such as inside the dot-eating detection loop or the ghost collision handler.
Beyond sounds, small animation touches dramatically improve the feel of the finished game and teach kids that polish is what separates amateur projects from professional ones. The Pacman chomping animation (alternating between open and closed mouth costumes) is the most important visual effect, but kids can also add color-changing effects to ghosts using the “change color effect” block inside a loop. Score pop-up animations, flashing backgrounds when a power pellet is eaten, and smooth transitions between game states all contribute to a more polished final product. Encouraging kids to watch their favorite games critically and identify the small details that make them feel good builds an appreciation for craftsmanship in creative technology work that extends well beyond coding into design, writing, and any other field where quality matters.
Coding Concepts Kids Learn from Pacman Projects
Building a Pacman game in Scratch teaches an impressive range of programming fundamentals that transfer directly to more advanced languages like Python, JavaScript, and beyond. Loops (the “forever” and “repeat” blocks) appear throughout the project, from the main game loop that keeps Pacman moving to the clone spawning loop that distributes dots across the maze. Conditionals (“if” and “if-else” blocks) drive every decision in the game, from checking arrow key presses to detecting collisions with walls, dots, and ghosts. These two constructs alone form the backbone of virtually every program ever written, and kids who internalize them through Pacman are building a foundation for a lifetime of coding.
Variables in the Pacman project serve multiple distinct purposes, which helps kids understand that the same concept can be applied in very different ways. The Score variable acts as a counter that only increases, the Lives variable acts as a counter that only decreases, and direction-related values control sprite orientation. Seeing variables used for scoring, state tracking, and behavior configuration within a single project demonstrates their versatility in a way that isolated exercises cannot. Kids also encounter the idea of scope when they realize that some variables need to be accessible to all sprites (global variables like Score) while others might only be relevant to a single sprite.
The broadcasting system used for ghost-Pacman communication introduces event-driven programming, which is the dominant paradigm in web development, mobile apps, and game engines throughout the professional software industry. When a ghost broadcasts “caught Pacman” and the Pacman sprite responds to that broadcast, kids are experiencing the same architectural pattern that powers every button click on a website, every notification on a smartphone, and every multiplayer interaction in an online game. Learning this pattern through a fun, low-stakes project like Pacman means kids absorb it naturally rather than struggling with it when they encounter it in a more complex context years later.
Common Mistakes Young Coders Make (and Fixes)
Even experienced adult programmers encounter bugs and errors, so young coders should expect and embrace mistakes as a normal part of the development process. One of the most frequent issues beginners face is Pacman walking through walls, which almost always traces back to a mismatch between the step size in the movement code and the step size in the collision response code. If the “move” block advances 5 steps but the “move negative” block only reverses 4 steps, the sprite gradually drifts through walls one pixel at a time, creating a ghost-like Pacman that ignores maze boundaries entirely.
Another common problem is ghosts or dots spawning inside walls or outside the playable maze area. This happens when clone position coordinates do not align with the actual maze paths, and the fix requires carefully checking the x and y values used in “go to x y” blocks against the maze layout. Kids should use the mouse pointer coordinates displayed at the bottom of the stage to identify valid positions within their maze, and recording a list of safe coordinates before writing the clone spawning code prevents this issue entirely. The habit of planning data before writing code is one of the most valuable practices in software development.
The trickiest bug for young coders to diagnose is the “everything works but nothing happens” scenario, where the code appears correct but the game does not respond to inputs or display expected behavior. This usually results from forgetting the “when green flag clicked” event block at the top of a script, which means the code exists but never receives the signal to start running. Teaching kids to always check for a trigger event at the top of every script stack prevents this class of errors and builds the habit of thinking about program flow from the entry point downward, which is exactly how professional developers read and debug unfamiliar codebases.
Parent and Educator Tips for Supporting Young Coders
Parents play a crucial role in a child’s coding journey, even if they have no programming experience themselves. The most effective approach is to sit alongside the child during the first few sessions, not to dictate what they should do, but to ask genuine questions about their work and celebrate their progress. Questions like “how did you make that ghost move?” or “what happens if you change that number?” show interest without taking over, and they encourage the child to articulate their thinking, which deepens understanding more than any tutorial alone. Resisting the urge to fix problems for the child is equally important, because the struggle of debugging is where the deepest learning occurs.
Educators working with groups of students should structure Pacman projects as multi-session activities rather than trying to complete everything in a single class period. Breaking the build into distinct phases (maze design, sprite creation, movement coding, collision detection, scoring, and polish) gives students clear milestones and natural stopping points that prevent overwhelm. Pairing students who are slightly ahead with those who are struggling creates peer teaching opportunities that benefit both parties, since explaining a concept to someone else is one of the most effective ways to solidify one’s own understanding. Sharing completed projects on the Scratch community platform adds a social dimension that motivates students to produce their best work, because the audience expands beyond the classroom to a global community of fellow creators.
How Game-Based Learning Boosts Computational Thinking
Research consistently demonstrates that game-based learning approaches produce stronger engagement and better learning outcomes compared to traditional instruction methods, particularly in computer science education. A 2023 systematic review published in the International Journal of STEM Education found that game development-based learning (GDBL) significantly improved students’ acquisition of programming skills across multiple educational levels and countries. When kids build games like Pacman, they are not just learning syntax and logic; they are practicing systems thinking, decomposition, pattern recognition, and abstraction, which are the four pillars of computational thinking that educators worldwide consider essential for the modern workforce.
The motivational advantages of game-based coding projects are particularly significant for reaching students who might otherwise disengage from STEM subjects. Kids who struggle with math worksheets or feel intimidated by traditional science labs often thrive when the same concepts are embedded within a game they are excited to build and play. The intrinsic motivation that comes from wanting to finish a game, share it with friends, and add new features creates a self-sustaining learning loop that external rewards like grades and stickers cannot match. This is why platforms like Scratch, which frame coding as creative play rather than academic study, have succeeded in reaching demographics that traditional CS education historically underserved.
Game development projects also teach soft skills that rarely appear in curriculum standards but matter enormously in professional settings. Planning a Pacman game requires project management (breaking a large goal into smaller tasks), iteration (testing and refining until the game feels right), and user empathy (considering what will make the game fun for someone else to play). These skills parallel the workflows used in professional software development, product design, and creative industries, which means kids who build games on Scratch are preparing for careers across multiple fields without even realizing it.
Screen Time, Safety, and Balanced Coding Habits
The question of screen time is a legitimate concern for parents, and coding activities deserve a more nuanced evaluation than passive entertainment like watching videos or scrolling social media. Active screen time, which includes building projects in Scratch, writing code, and solving programming challenges, engages different cognitive processes than passive consumption and has been linked to improved problem-solving skills and academic performance across multiple studies. The American Academy of Pediatrics distinguishes between passive and interactive screen time, and coding falls firmly into the interactive category that educators and pediatricians alike consider constructive.
Setting reasonable boundaries remains important even with productive coding activities, because physical health, social development, and diverse interests all require time and attention beyond any single activity. A practical approach is to establish 30 to 45 minute coding sessions followed by breaks that include physical activity, outdoor play, or non-screen creative activities like drawing or building with physical materials. Parents can also integrate offline coding activities (such as planning maze designs on paper before opening Scratch, or mapping out game logic with flowcharts) that extend the learning without adding screen time. The goal is not to eliminate screens but to create a balanced daily routine where coding is one enriching component among many.
The Ethical Side of Teaching Kids to Code
Introducing children to programming opens a broader conversation about digital citizenship, online safety, and the responsibilities that come with creating technology. When kids share their Pacman projects on the Scratch community platform, they are participating in a public online space where behavior norms, intellectual property considerations, and constructive communication all matter. Scratch’s community guidelines emphasize being respectful, being constructive, and sharing honestly, which provides a structured framework for kids to practice ethical digital behavior in a moderated and age-appropriate environment.
The concept of remixing on Scratch raises interesting questions about originality and attribution that mirror larger conversations in the creative and technology industries. Scratch encourages remixing (modifying and building upon other people’s shared projects) and automatically credits the original creator when a project is remixed, which introduces kids to the idea that building on existing work is legitimate and valuable as long as credit is given. This is a simplified version of the open-source software philosophy that powers much of the modern internet, and understanding it early helps kids navigate more complex intellectual property questions as they grow older and begin contributing to real-world projects.
Teaching kids about the impact of their creations is just as important as teaching them the technical skills to build those creations. A Pacman game is harmless, but the same programming skills can be used to build applications that affect real people in positive or negative ways. Age-appropriate discussions about what makes technology helpful versus harmful, and about the designer’s responsibility to consider how their creation will be used, plant seeds of ethical thinking that become increasingly important as AI, automation, and social media continue to reshape society and the workforce. Parents and educators who frame coding as a power that comes with responsibility are giving kids a moral compass alongside their technical toolkit.
Where Scratch and Kids Coding Are Headed Next
The future of Scratch and children’s coding education is being shaped by advances in artificial intelligence, mobile-first design, and a growing global consensus that programming is a fundamental literacy rather than a niche skill. Scratch has already begun experimenting with AI-related extensions, including machine learning modules that let users train simple image and speech recognition models directly within the block-based environment. These experimental features signal a future where kids can build projects that incorporate AI capabilities alongside traditional game logic, blurring the line between simple coding exercises and genuinely intelligent applications.
Mobile accessibility is another major frontier, as Scratch’s development team continues improving the platform’s responsiveness on tablets and smartphones. The shift toward mobile-first learning reflects the reality that many children around the world access the internet primarily through mobile devices rather than laptops or desktops, and ensuring that Scratch works well on these devices is essential for maintaining the platform’s commitment to global equity. Improved touch controls, responsive layout adjustments, and offline editing capabilities are all part of the roadmap that will make Scratch more accessible to the next generation of young coders regardless of their hardware situation.
The broader kids coding landscape is moving toward integration with school curricula rather than existing solely as an extracurricular activity, and Scratch is positioned at the center of this shift. Countries including the United Kingdom, Australia, Japan, and several European nations have already incorporated coding into their national education standards, and the United States is following with increasing state-level adoption of computer science requirements. As these mandates expand, demand for age-appropriate, engaging, and proven platforms like Scratch will continue to grow, ensuring that millions more children will have the opportunity to build their own Pacman games and discover the creative power of code in the years to come.
Key Insights on Coding for Kids and Scratch Game Development
- Scratch has surpassed 130 million registered users worldwide, with the largest user group being 12-year-olds, demonstrating the platform’s massive reach in elementary and middle school education.
- According to Code.org, 67% of all new STEM jobs are in computing, yet only 11% of STEM graduates are in computer science, revealing a gap that early coding education through platforms like Scratch can begin to close.
- A systematic review in the International Journal of STEM Education confirmed that game development-based learning significantly improves programming skill acquisition across multiple age groups and educational settings.
- Research from PMC found that game coding education was significantly effective in decreasing problematic internet use and improving self-esteem among adolescents, suggesting benefits beyond technical skill development.
- Scratch’s block-based approach produces measurably stronger cognitive outcomes, with an MIT study highlighting that students who program in Scratch develop better computational thinking skills compared to peers without coding experience.
- The Scratch community has shared over 1.15 billion projects since launch, with the platform reaching its one-billionth project in April 2024, illustrating the extraordinary volume of creative output the platform enables.
- Within its first year, Pac-Man was played 250 million times per week, making it one of the most commercially successful arcade games ever and a culturally resonant project choice for teaching game design concepts to children.
- Countries including the UK, Australia, and Japan have incorporated coding into national education standards, with the United States seeing growing state-level adoption that positions Scratch-based curricula at the center of K-12 computer science instruction.
The data paints a clear picture: early coding education through game-based projects delivers cognitive, emotional, and career-readiness benefits that extend far beyond learning to write code. Scratch’s free, accessible, and community-driven model has made it the dominant platform for introducing children to programming worldwide. The combination of a proven educational approach, massive global adoption, and measurable learning outcomes makes Pacman-style game projects one of the most effective entry points into computer science for young learners. The challenge moving forward is not whether coding education works, but how to ensure every child has equitable access to it regardless of geography, income, or background. As Scratch continues to evolve and as national curricula increasingly incorporate programming, the opportunity for parents and educators to act is stronger than it has ever been.
Coding for Kids: Comparing Learning Approaches
| Dimension | Block-Based Coding (Scratch) | Text-Based Coding (Python) | Unplugged Activities | Online Tutorials (Video) |
|---|---|---|---|---|
| Transparency | Full visibility of code logic through visual blocks | Code visible but syntax can obscure logic | No code involved; concepts taught abstractly | Passive observation of someone else coding |
| Participation | High: kids build, test, and share projects actively | Moderate: typing barriers reduce engagement for young learners | Moderate: physical activities engage but lack digital output | Low: watching does not equal doing |
| Trust | Built through a moderated community and immediate feedback | Requires trust in error messages and documentation | Built through teacher guidance and peer interaction | Dependent on video creator credibility |
| Decision Making | Kids choose sprites, logic paths, and game mechanics | Kids make syntax and architecture decisions | Decisions are pre-structured by activity design | Decisions are made by the instructor on screen |
| Misinformation Risk | Low: code either works or produces visible errors | Low: runtime errors provide factual feedback | Low: teacher-led activities correct in real time | Moderate: outdated or incorrect tutorials persist online |
| Service Delivery | Free, browser-based, no installation required | Requires software installation and configuration | Requires physical materials and trained facilitators | Free but quality varies enormously |
| Accountability | Project outputs demonstrate learning visibly | Code submissions demonstrate learning | Teacher observation assesses understanding | No built-in assessment or accountability mechanism |
How Scratch Pacman Projects Are Transforming Classrooms
Code.org’s Hour of Code and Scratch Integration
Code.org’s Hour of Code campaign has introduced millions of students to programming through short, engaging activities, and Scratch-based game projects feature prominently in its recommended curriculum. The initiative has reached over 100 million students across 180 countries, making it the largest educational campaign of its kind, and Pacman-style maze games rank among the most popular project types completed during Hour of Code events. Teachers consistently report that game-based activities produce higher engagement rates and more positive attitudes toward computer science compared to non-game alternatives. The primary limitation is that one-hour introductions rarely provide enough depth for students to develop lasting programming skills, which is why educators increasingly use Hour of Code as a springboard into longer-term Scratch curricula rather than a standalone experience.
Scratch’s Global Reach in Asian Education Systems
Japan, South Korea, and Singapore have integrated Scratch into their national education frameworks as part of broader pushes to prepare students for technology-driven economies. Japan’s 2020 curriculum revision made programming education mandatory for all elementary school students, and Scratch became the default platform for implementation due to its visual interface and multilingual support. The Ministry of Education in Japan reported that schools using game-based Scratch projects saw measurably higher student engagement compared to schools using textbook-based approaches. Critics note that teacher training has not kept pace with curriculum mandates, and many elementary school teachers lack confidence in teaching coding, which creates inconsistent quality of instruction across different schools and regions.
CodaKid and Create & Learn’s Structured Game Curricula
Online coding platforms like CodaKid and Create & Learn have built entire course sequences around game development projects in Scratch, including detailed Pacman tutorials that extend over multiple sessions. CodaKid reports that students who complete full game projects demonstrate stronger retention of programming concepts compared to students who only complete isolated coding exercises. The structured approach breaks complex projects into manageable steps with checkpoints and challenges that adapt to the student’s pace. A limitation of commercial platforms is their cost, which can exclude families who cannot afford monthly subscriptions, creating equity gaps that mirror broader inequalities in access to quality STEM education for children from lower-income households.
Lessons From Early Coding Education Programs Worldwide
ScratchEd at Harvard and the Teacher Network Effect
Harvard Graduate School of Education’s ScratchEd initiative created a global professional development community for educators teaching with Scratch, providing free workshops, curriculum resources, and peer support networks. The program trained thousands of teachers across dozens of countries and demonstrated that teacher confidence in using Scratch increased by over 60% after participating in structured professional development. ScratchEd’s research found that the most effective Scratch classrooms were those where teachers positioned themselves as co-learners alongside students rather than as traditional instructors delivering predetermined lessons. The program’s primary challenge was scaling beyond well-resourced schools and districts, as many of the most enthusiastic adopters were already in privileged educational environments with strong technology infrastructure and administrative support for innovation.
Estonia’s ProgeTiger and National Coding Literacy
Estonia’s ProgeTiger initiative, launched by the Information Technology Foundation for Education, made coding education available to students starting at age seven across the country’s entire public school system. The program equipped schools with technology resources and provided teacher training focused on project-based learning using Scratch and similar platforms, and participation grew to include the majority of Estonian schools within its first five years. Students who participated in ProgeTiger demonstrated measurably higher computational thinking scores on standardized assessments, and Estonia’s PISA scores in science and mathematics remained among the highest in Europe during the same period. Critics point out that Estonia’s small population and strong existing technology infrastructure made nationwide rollout feasible in ways that larger or less-resourced countries cannot easily replicate, limiting the program’s usefulness as a universal template for coding education reform.
Code Club’s Community-Driven Model in the UK
Code Club, now part of the Raspberry Pi Foundation, operates a network of volunteer-led after-school coding clubs across the United Kingdom and in over 160 countries worldwide, with Scratch as its primary teaching platform for younger participants. The organization provides free project resources and training materials that volunteers use to guide children through game development and creative coding activities, including Pacman-style maze game tutorials. Over 200,000 young people participate in Code Club sessions each year in the UK alone, and independent evaluations found that participants showed increased confidence in their ability to create with technology and improved attitudes toward computer science as a potential career path. The volunteer-dependent model creates inconsistency in instruction quality and club sustainability, as clubs in areas with fewer available volunteers or meeting spaces tend to operate intermittently or shut down entirely, which disproportionately affects children in rural and lower-income communities.
Common Questions About Making Pacman on Scratch for Kids
Most children can begin building a basic Pacman game in Scratch around age 8 or 9, which aligns with the platform’s target age range. Younger children (ages 5 to 7) can use ScratchJr for simpler game projects and transition to full Scratch when their reading and logic skills develop. The key indicator of readiness is whether the child can follow multi-step instructions and tolerate the trial-and-error process of debugging.
No prior coding experience is required, though spending 15 to 30 minutes exploring the Scratch editor before starting the Pacman project helps build familiarity with the interface. The Pacman tutorial is designed as a beginner-friendly project that introduces new concepts step by step. Each phase of the build adds one new skill on top of what was learned in the previous phase.
A basic Pacman game with movement, dots, scoring, and ghosts typically takes three to five sessions of 30 to 45 minutes each. More ambitious versions with power pellets, multiple levels, and polished animations can take additional sessions. Breaking the project into smaller milestones prevents burnout and gives kids a sense of accomplishment at each stage.
Most kids find collision detection (making Pacman stop at walls rather than pass through them) to be the trickiest part of the project. The color-sensing approach requires that maze walls use a unique color not shared by any other game element. Testing wall detection from every angle and adjusting step sizes usually resolves any issues within a few minutes of focused debugging.
Customization is one of the best parts of the project, and Scratch makes it easy to add personal touches at any time. Kids can design new maze layouts, create original ghost characters, add power-up items, implement multiple levels, include background music, or change the entire theme to suit their interests. The Scratch community features thousands of remixed Pacman projects that showcase creative variations.
Scratch is 100% free to use, and the platform is maintained by the nonprofit Scratch Foundation with support from donations and grants. There are no premium tiers, no paid features, and no advertisements on the platform. Projects can be created, saved, and shared without any cost, making it one of the most accessible coding education tools available worldwide.
After Pacman, popular next projects include platformer games (like simple Mario-style side-scrollers), Pong, Space Invaders, Flappy Bird clones, and maze runners with original themes. Each project type introduces new programming concepts that build on the foundations established during the Pacman build. The Scratch community tutorials section features dozens of guided game projects at various skill levels.
Scratch is the most widely used block-based coding platform in the world, with over 130 million registered users, and it is distinguished by its free access, moderated community, and strong research backing from MIT. Alternatives like Code.org, Tynker, and Blockly offer similar block-based coding experiences with different feature sets and pricing models. Scratch’s open-ended creative environment makes it particularly strong for game development and artistic expression.
Absolutely, and the tutorial format of this guide is designed specifically to make that possible. Parents do not need to understand the code themselves; they can support their child by reading instructions aloud, asking questions about what the child is building, and celebrating milestones. The most helpful thing a non-technical parent can do is resist the urge to solve problems for the child and instead encourage them to experiment and debug independently.
Scratch works on any modern web browser (Chrome, Firefox, Safari, Edge) on laptops, desktops, and Chromebooks, and the Scratch app is available for tablets and some mobile devices. A stable internet connection is needed for the online editor, though an offline desktop editor is available for Windows, macOS, and ChromeOS. The platform does not require powerful hardware, and most school-issued devices run Scratch without any issues.
Research consistently shows that coding activities improve performance in mathematics, science, and language arts by strengthening logical thinking, systematic reasoning, and clear communication skills. The Pacman project specifically reinforces coordinate geometry (x and y positions), arithmetic (scoring and variable manipulation), and creative writing (designing game narratives and instructions). Many teachers report that students who code regularly demonstrate improved persistence and problem-solving habits across all academic subjects.
After completing the project, clicking the orange “Share” button at the top of the Scratch editor publishes the game to the Scratch community, where anyone with the project link can play it directly in their browser. Kids can also share their project link via email, messaging apps, or social media. The Scratch platform handles all hosting and display, so there is no need to set up separate web hosting or file sharing.
Scratch provides an excellent foundation for transitioning to text-based programming languages like Python, JavaScript, or Java. The concepts learned in Scratch (loops, conditionals, variables, events, functions) have direct equivalents in every major programming language. Many coding academies and online platforms offer bridge courses specifically designed to take students from Scratch to Python or web development, leveraging the conceptual knowledge they already possess.